Espoma Organic
  • Products
    • Close
    • Product Line Overview
    • Plant food finder
    • Garden Fertilizers
    • Potting Soils
    • Liquid Fertilizers
    • Lawn Fertilizers
    • Single Ingredients
    • Conventional Plant Foods
    • Animal Care Products
  • Where to Buy
  • Our Story
    • Close
    • Our Story
    • Locations
    • Historical Timeline
    • Our Commitment
    • Directions
    • Solar
    • Join our Team
    • Espoma Brand Partners
  • Learn
    • Close
    • Espoma Blog
    • FAQ’s
    • Pocket Guide
    • Espoma Guides
    • Garden Clubs
    • Safe Paws Lawn
    • PRODUCT FACT SHEETS
    • Fertilizer Fundamentals
      • Close
      • Understanding Plant Nutrition
      • Reading Labels
      • Choosing the Right Type of Fertilizer
      • Terms & Definitions
    • Gardening Projects
    • Resource Links
  • Contact Us
  • Menu Menu

How to Repot a Bromeliad

April 27, 2018/in Espoma Videos

Summer Rayne Oaks of Homestead Brooklyn demonstrates the ins and outs of repotting bromeliads. Follow along as she explains the difference between the pup and mother plant and what happens when you remove the pup vs leaving it on to continue growing. Utilizing her expansive collection of plants, she shows us what both scenarios look like in the repotting process.

Three takeaways from this video:

Summer Rayne teaches you how to get a brand new bromeliad from a plant that is about to expire. With the right care, she was able to get new life from the plant.

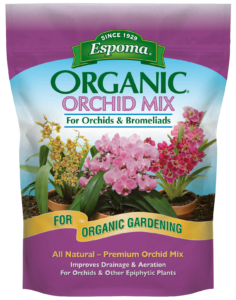
The best soil to use for bromeliads is a barky airy mix, such as The Espoma Company’s Organic Orchid Mix, that’s full of nutrients.

Once the pup is either 1/3 to 1/2 the size of the mother plant, you can decide to remove the pup for the mother to grow another or keep it on and watch it grow from the mother until it expires.

5 Steps for Repotting a Bromeliad:

  1. Grab some gloves. Some of the leaves are going to be prickly, so you want to protect yourself.
  2. Grab scissors or sheers. If the mother plant is desiccated or if you want to remove the pup before repotting, you will need something sharp to remove them.
  3. Remove the bromeliad from the container and separate it from the mother plant, if possible.
  4. When placing the bromeliad into the new container, center it and fill with Espoma’s Orchid Mix. You don’t need to tuck it in too hard, as it likes having room to breathe.
  5. Water it in well to help it settle into its new home.

*Remember, if you have a healthy mother plant and a healthy pup, you can plant them together or separately. You won’t harm it either way.

*****

Learn more about Summer Rayne here:

Website: homesteadbrooklyn.com

Instagram – @homesteadbrooklyn

YouTube – Summer Rayne Oakes

Twitter – @sroakes

Facebook – Summer Rayne Oaks


Featured Products:

Where to Buy

https://www.espoma.com/wp-content/uploads/2018/04/Espoma-Bromeliad-Thumb-1.png 788 1404 espoma https://www.espoma.com/wp-content/uploads/2023/05/espoma-logo340w-1.png espoma2018-04-27 16:46:052023-02-21 11:33:09How to Repot a Bromeliad

When to Plant Strawberries (Hint: Think Spring)

April 23, 2018/in Fruits & Vegetables

Juicy, sweet strawberries picked from your own garden are simply the best. Plus, taking strawberries from your own garden to your plate is so rewarding. Create a berry garden by pairing with blueberries, blackberries and raspberries.

The key to growing berries, no matter where you garden, is good-quality organic soil.

Choosing your Strawberry Plant:

The first step is to pick the type of Strawberry plant you want to grow. Take the amount of growing time Think about where you’ll plant your berries to get the best results. Visit your local garden center to find the best type of strawberry for you.

June-bearing. This traditional berry will usually produce one large harvest in late spring or early summer depending on temperature. June-bearing strawberries are available in early, mid-season and late varieties.

Ever-bearing. These scrumptious strawberries produce two to three harvests intermittently during the spring, summer and fall. Because ever-bearing plants do not send out many runners, they make great choices for containers.

Day-Neutral. Grow these to keep producing fruit throughout the growing season. They continuously fruit if temperatures are between 35-85°F. Because they produce few runners, they are great when space is limited, but the fruits are usually somewhat smaller than June bearers.

Once you’ve picked your plants, it’s time to get them in the ground. Strawberries grow best in full sun and in soil with a pH of 5.5 to 7.  If your pH level is too high, add Espoma’s Soil Acidifier for ideal soil conditions.

4 Steps to Plant Strawberries

1. Plant strawberries as soon as the ground can be worked in the spring.

2. Space plants at least 20” apart. Dig holes deep and wide enough to accommodate the entire root system.

3. Plant the crown (the parts of the plant that are above ground) at soil level; firm soil around it.

4. Add compost to bed and encourage strawberries to grow by adding Espoma’s Holly-tone, an organic plant food perfect for these acid-loving plants.

Short on space or looking to grow strawberries vertically? Check out how Laura from Garden Answer grows.


See the Total Berry Guide Here

Espoma products to help you grow your best strawberries yet:


Where to Buy
https://www.espoma.com/wp-content/uploads/2018/04/strawberry-plants.jpg 847 1280 espoma https://www.espoma.com/wp-content/uploads/2023/05/espoma-logo340w-1.png espoma2018-04-23 15:30:492022-04-12 14:21:03When to Plant Strawberries (Hint: Think Spring)

Classic Houseplants for your Living Room

April 23, 2018/in Indoor Gardening

What is the most commonly used room in your home? It’s probably the living room. It’s where the whole family comes together, where visitors sit and enjoy conversations and where memories are made. We’ve already shared houseplants for your kitchen and bedroom; now let’s focus on the living room.

Houseplants differ in needs of light, space and water. So we are outlining the perfect houseplants to add to a medium or brightly lit living room.

Head to your local garden center to pick any of these beauties up. And don’t forget to grab some Indoor! liquid fertilizer to give your plants a boost.

Here are our top picks for plants in the living room:

String of Pearls

This easy to grow succulent adds dimension and design to any space. As the string of pearls gently cascade down the container, it resembles jewelry hanging off of a shelf. You can’t go wrong with this classic plant. It grows best in bright light. Make sure you feed regularly with Espoma Organic’s Cactus! liquid fertilizer.

Philodendron

This heart-leafed plant will inspire anyone who comes in contact with it. It has gained popularity due to it’s big, angular leaves. It is easy to grow and will tell you when it needs a little bit of love through it’s slightly dropping leaves. Philodendrons prefer bright, indirect light.

Umbrella Tree

Aptly named for foliage that look like miniature umbrellas, this tree is the perfect addition to your home. This tree needs bright, indirect light – if they do not receive enough light, they can get leggy, so be sure to keep an eye on it to ensure it is getting the light it needs. Learn more about dealing with leggy plants.

Rubber Tree

Don’t be intimidated by a tree this size. Get a young rubber tree and train it to any size you want. Caring for this tree is simple – put it in bright, indirect light so it doesn’t over heat. Enjoy the oversized foliage, and a few compliments from visitors.

Staghorn Fern

This antler-like foliage will be the conversation starter you were looking for. Mount this fern on any wall or place it in a basket to really show off it’s beauty. This fern does well in low-to-medium light, so it will be happy anywhere you place it.

Learn how to fertilize these houseplants from Homestead Brooklyn.


https://www.espoma.com/wp-content/uploads/2018/04/string-of-pearls.jpg 667 1000 espoma https://www.espoma.com/wp-content/uploads/2023/05/espoma-logo340w-1.png espoma2018-04-23 13:00:062019-05-07 09:58:43Classic Houseplants for your Living Room

Bulbs to Plant Now for Late Summer Color

April 20, 2018/in Flowers

Right about now, daffodils and tulips are in full bloom making even the simplest of streets beautiful.

People are snatching up the blooms and putting them in vases and arrangements. And some are even heading into garden centers to get those flowers for their garden.

But, in most regions, spring blooming bulbs are best planted in fall to be able to bloom in the spring.

Don’t worry! There are many varieties of spring-planted bulbs that are just as beautiful as your traditional favorites.

Keep your garden thriving and plant bulbs now to have amazing summer color. Wait until the last frost date has passed to plant to ensure your bulbs won’t freeze. Check the tags on your bulbs for planting information or head over to your local garden center for specific region information. Don’t forget to mix your soil with Bulb-Tone to create beautiful big blooms!

Our Favorite Bulbs to Plant this Spring

Dahlia

With a variety of sizes, colors and designs, dahlias have become one of the most popular flowers. Be sure to buy a bunch of bulbs though, it’s hard to plant just one. Bloom time is between mid-July and September. These dazzling beauties will showcase your garden anywhere you plant them. They are technically a tuber, but are planted the same way you would plant a bulb.

Lily

Stay on trend this year and plant a lily. With the option of Asiatic, Trumpet or Oriental, or a mixture of the three, your garden will be full of color lasting summer through fall. Look for lilies with the color and pattern to add texture and design. Bloom time is between June and September, depending on variety.

Begonia

Known as a grandmother’s flower, begonia’s are perfect for any garden. Most people don’t know that the begonia family is quite large, with lots of colors, shapes and sizes. Bloom time starts in mid-July. Since there are so many options with begonias, choose something in the double flower, ruffled double flower or the pendulous varieties.

Calla Lilies

This eye-catching flower will add wonder to your garden. Calla lilies are elegant and timeless and perfect for containers. They come in a large variety of colors and textures to match every style. Bloom time is between July and October. Grab varieties of calla lilies such as Flame, Captain Marrero or Ruby Sensation for the paintbrush affect.

Ranunculus

This exquisite flower is a display itself with its layer upon layer of silky petals. It is similar to a rose and is often considered high end delicacy. One thing to remember is to soak the bulb before planting to encourage growth. Bloom time is between June and August.

Watch below as Laura from Garden Answer shows how to plant bulbs!


https://www.espoma.com/wp-content/uploads/2018/04/Calla-Lillies-.jpg 667 1000 espoma https://www.espoma.com/wp-content/uploads/2023/05/espoma-logo340w-1.png espoma2018-04-20 13:10:222019-05-07 09:58:43Bulbs to Plant Now for Late Summer Color

Build Your Own Vertical Strawberry Planter (Quick Version)

April 18, 2018/in Espoma Videos

Have a minute? Laura from Garden Answer shows us how to make vertical strawberry planters. She walks you through step by step, showing what materials to use, what potting soil and fertilizer is needed and how to hang the finished product.

This wind chime inspired planter will add life to your garden while adding an element of design to your home.

But, be sure to keep the materials in mind – even Laura almost used toxic tubing for the project.

Pro Tip: Mixing Espoma Organic Potting Mix with the Organic Bio-Tone Fertilizer allows the strawberries to get a boost in their new container while releasing nutrients slowly to ensure the edibles are being fed for a long time.

Want to watch the extended version? View it here!

Materials she used includes:

  • Galvanized Duct Work and Cap
  • Self-Tapping Sheet Metal Screws
  • Drill, Bits and 2.5″ Bi-Metal Saw
  • 1/8 inch Quick Links (x6 pieces)
  • Chain (x3 pieces)
  • 1.5 inch Ring
  • Espoma Organic Potting Mix
  • Espoma Organic Bio-Tone
  • Strawberries of your choice
  • Moss
  • Hook

Step-By-Step Instructions:

Construction

  1. Connect your galvanized tubing. There is a rivet on where they should connect – be sure to work from one end to the other to make sure it is secure.
  2. Drill a drainage hole in the bottom of the cap with a metal drill bit. Place the cap on the corrugated end and use 5 self-tapping screws to secure.
  3. Measure your planting holes. Start an inch away from the seam to keep the integrity of the tubing. Each hole should be 7.5″ away from each other. Use a pencil to mark where to drill. This will be your starting place.
  4. Drill your holes with a 2.5″ bi-metal hole saw. Ask one person to hold the tubing while the other saws. You will end up with about 15-16 holes. Safety tip: Wear long sleeves, gloves and eye protection to protect yourself from the metal.
  5. Keep your gloves on while handling the tube as it is sharp.
  6. Drill 3 holes in the top to get it ready to hang.
  7. Attach 1/8″ quick links to each of the holes. Connect your chain to the quick links. Add one more quick link to the end of each chain and each of those will go into one 1.5″ ring.

Planting:

  1. Starting from the bottom hole, add in Espoma Organic Potting Mix and Bio-Tone Fertilizer. Pro Tip: Mixing Espoma Organic Potting Mix with the Organic Bio-Tone Fertilizer allows the strawberries to get a boost in their new container while releasing nutrients slowly to ensure the edibles are being fed for a long time.
  2. Plant each hole with a strawberry and move your way up! You can also add a plant at the very top!
  3. Take little pieces of moss and add them around the strawberry plant. This will help keep the plant inside of the planter and help clean up your project.
  4. Hang your planter with a hook (Laura uses an S-hook).
  5. Slowly water in your new planter – watering too fast can make the plants fall out since their roots haven’t been established yet.

Enjoy!

See the Total Berry Guide Here

Espoma products to help you grow your best strawberries yet:


Where to Buy
https://www.espoma.com/wp-content/uploads/2018/04/IMG_9208.jpg 3368 6000 espoma https://www.espoma.com/wp-content/uploads/2023/05/espoma-logo340w-1.png espoma2018-04-18 10:56:322024-05-20 14:29:38Build Your Own Vertical Strawberry Planter (Quick Version)

Build Your Own Vertical Strawberry Planter (Extended Version)

April 13, 2018/in Espoma Videos

Need a new and updated way to grow your strawberries? Try growing them vertically!

This windchime inspired planter will add life to your garden while adding an element of design to your home. Watch as Laura from Garden Answer shows us how to make vertical strawberry planters.

Be sure to keep the materials in mind – even Laura almost used toxic tubing for the project.

Materials she used includes:

  • Galvanized Duct Work and Cap
  • Self-Tapping Sheet Metal Screws
  • Drill, Bits and 2.5″ Bi-Metal Saw
  • 1/8 inch Quick Links (x6 pieces)
  • Chain (x3 pieces)
  • 1.5 inch Ring
  • Espoma Organic Potting Mix
  • Espoma Organic Bio-Tone
  • Strawberries of your choice
  • Moss
  • Hook

Step-By-Step Instructions:

Construction

  1. Connect your galvanized tubing. There is a rivet on where they should connect – be sure to work from one end to the other to make sure it is secure.
  2. Drill a drainage hole in the bottom of the cap with a metal drill bit. Place the cap on the corrugated end and use 5 self-tapping screws to secure.
  3. Measure your planting holes. Start an inch away from the seam to keep the integrity of the tubing. Each hole should be 7.5″ away from each other. Use a pencil to mark where to drill. This will be your starting place.
  4. Drill your holes with a 2.5″ bi-metal hole saw. Ask one person to hold the tubing while the other saws. You will end up with about 15-16 holes. Safety tip: Wear long sleeves, gloves and eye protection to protect yourself from the metal.
  5. Keep your gloves on while handling the tube as it is sharp.
  6. Drill 3 holes in the top to get it ready to hang.
  7. Attach 1/8″ quick links to each of the holes. Connect your chain to the quick links. Add one more quick link to the end of each chain and each of those will go into one 1.5″ ring.

Planting:

  1. Starting from the bottom hole, add in Espoma Organic Potting Mix and Bio-Tone Fertilizer. Pro Tip: Mixing Espoma Organic Potting Mix with the Organic Bio-Tone Fertilizer allows the strawberries to get a boost in their new container while releasing nutrients slowly to ensure the edibles are being fed for a long time.
  2. Plant each hole with a strawberry and move your way up! You can also add a plant at the very top!
  3. Take little pieces of moss and add them around the strawberry plant. This will help keep the plant inside of the planter and help clean up your project.
  4. Hang your planter with a hook (Laura uses an S-hook).
  5. Slowly water in your new planter – watering too fast can make the plants fall out since their roots haven’t been established yet.

Enjoy!


See the Total Berry Guide Here

Espoma products to help you grow your best strawberries yet:


Where to Buy
https://www.espoma.com/wp-content/uploads/2018/04/Espoma-Thumbnail.jpg 1080 1920 espoma https://www.espoma.com/wp-content/uploads/2023/05/espoma-logo340w-1.png espoma2018-04-13 08:00:282022-04-12 14:23:18Build Your Own Vertical Strawberry Planter (Extended Version)

Get Easy Blooms with Spring Planted Bulbs

April 7, 2018/in Spring Gardening

Spring-planted bulbs will burst with beautiful blooms that are perfect for bouquets and make a statement with little effort. For the best flower show, we recommend planting plenty of bulbs.

If it’s about 60°F and you’re ready to plant your tomatoes outside, then it’s warm enough to plant summer bulbs. If your days are still cold, start your bulbs indoors in pots. Then, move them to the garden when the weather improves. Or, leave them in the pots to liven up porches and patios.

Dahlias, canna lilies, begonias and gladiolus all make great additions to yards. Head to your local garden center to find out which spring flowering bulbs are best for your region.

Plant Summer Bulbs in 6 Simple Steps:

1. Visit your local garden center to choose your bulbs.

2. Select where you want to plant your bulbs so they’ll get the right amount of sun. Choose a place where they won’t be accidentally dug up, such as under a tree, in a lawn or in a perennial bed.

3. Plant bulbs using a spade or bulb planter in well-drained soil to the depth indicated on the package. Some bulbs, like dahlias, need to be planted deeper.

4. Sprinkle Espoma Organic’s Bulb-tone in the hole and place your bulb.

5. Replace the soil, gently pressing it down and water your newly planted bulbs.

6. Cover bulbs with a layer of mulch to keep moisture in and weeds out.

Once your bulbs have bloomed, remove the faded flowers but leave the foliage. They bulbs will use it to store energy for next year.

Are your spring bulbs spent? Watch how Garden Answer cares for tulips after they’ve bloomed.

https://youtu.be/K0FMDf96ak4


https://www.espoma.com/wp-content/uploads/2018/04/shutterstock_786179203.jpg 664 1000 espoma https://www.espoma.com/wp-content/uploads/2023/05/espoma-logo340w-1.png espoma2018-04-07 08:00:032019-05-07 09:58:44Get Easy Blooms with Spring Planted Bulbs

Rain, Rain, Come My Way

April 6, 2018/in Blog, Spring Gardening

April showers bring May flowers. The old saying is true. April is full of rain, but there’s no reason you can’t have flowers before May.

During rainstorms, water gushes out of downspouts, across lawns and gardens. It has a tendency to accumulate in one place and can overwater or even flood a garden. Excessive rain saturates soil, suffocates roots, breaks plants and attracts pests.

However, when you’ve strategically planted for rain, gushing downspouts are no longer a problem. A rain garden is a garden that uses water-loving plants, with strong roots. It helps use rain where it lands instead of letting it run-off into streams, lakes and rivers.

5 Steps for Building a Rain Garden 

1. Choose your location

Measure out at least 10 feet from your home. Keep your new garden away from septic systems. Find somewhere with a natural downgrade, away from the house, if possible. If your garden is level, then find a place where soil is already absorbing water easily. Stay away from soil that holds moisture for an extended period of time.

2. Create a design

Measure the size and shape of the area. Once you determine what you are working with, you can begin planning what to plant. Plan out what looks best to the eye first, while keeping in mind the plants that do best with wet feet should be in the middle.

orange flowers, organic

3. Choose your plants

Since each region gets a different amount of rainfall, native plants tend to do best. You will want plants that do well in wet and dry conditions. Rainfall will add up occasionally over the year, but the soil can dry out in the warmer months. Choose plants that don’t mind having wet roots for extended periods of time such as blue fescue grass, daylilies, elderberry and tupelo trees. Look for water-resistant natives such as black chokeberry, meadowsweet shrubs, Joe-Pye weed, Colorado blue spruce, bayberry, ferns and winterberry. Check out your local garden center for tips on the best plants for your region.

dirt and hoe, soil

4. Prepare the soil

As all gardeners know, it starts with the soil. Good drainage is key to prevent water from sitting. If your soil needs a fresh start, or to be amended, add Espoma’s Garden Soil to help set your rain garden up for success. Further improve drainage by using pervious surfaces, edging puddles and creating paths through low-lying areas with sand or stones.

5. Get ready for rain

It’s time to plant! Get your plants in the ground and watered in to stabilize them. Water every other day for two weeks to get it ready for a heavy rainfall and watch your garden grow!

Planning your rain garden will keep your garden running smoothly.

*****


Featured Products: 


https://www.espoma.com/wp-content/uploads/2018/04/rain-boots-garden-e1523048260521.jpg 406 600 espoma https://www.espoma.com/wp-content/uploads/2023/05/espoma-logo340w-1.png espoma2018-04-06 18:00:012024-10-22 14:09:06Rain, Rain, Come My Way

To Feed or Not to Feed: Organic Fertilizer Run Down

April 2, 2018/in Lawn

Just as you need energy to get through your day, your plants do too. And of course, when it comes to family-friendly gardening, organic fertilizer is the way to go!

What is Organic Fertilizer?

Organic fertilizers contain only ingredients from plant, animal or mineral sources.  Examples of these kinds of ingredients are bone meal, kelp meal and greensand.

Why use Organic Fertilizer?

While it is true that all fertilizers ultimately feed nutrients to plants in the same form, it is the process by which they are delivered that makes organic fertilizers superior to others.

Three ways to think about organic fertilizers:

 1. Gardening always starts with the soil. Organic fertilizer “feeds the soil that feeds the plants”. The process by which organic fertilizers deliver their nutrients enhances the fertility and structure of the soil.

Organics are digested by soil microorganisms, which then release the nutrients in a form available to plants. This process produces humus, a spongy material that improves soil structure. When you improve soil structure, the soil is better able to hold the proper balance of water, air and nutrients until they are required by plants.

Plants respond by developing larger root systems. Larger roots support more vigorous top growth and make plants less susceptible to drought. And by stimulating a healthy population of beneficial microorganisms in the soil, plants become more resistant to insects and diseases.

 2. Organic fertilizers will provide slow, steady feeding, as the plants require it. The release process is slow and largely dependent upon three factors: the microbial population in the soil, moisture, and soil temperature.

A healthy population of microbes in the soil is necessary for the digestion process. Moisture is required to sustain microbial life as well as to keep nutrients flowing into the plants root zone. And soil temperature is critical because as it rises, plants require nutrients more rapidly.

Fortunately, microbial activity mimics these requirements and increases as soil temperature rises, so that organics feed the needed nutrients as the plants require them.

Espoma fertilizers are safe for pets, people and the planet.

3. Most of the time, the gardener isn’t the only one in the garden. Organic fertilizers are the safest choice for your plants and the environment.Unlike synthetic plant foods, organics have an extremely low salt index, which means there is little to no risk of burning (dehydrating) plants in periods of extreme drought or when over-applying.

Organic fertilizers are generally very resistant to leaching out of the soil, so their nutrients stay in the root zone until the plants need them. And since most organic ingredients are byproducts from commercial farms and meat processing plants, the utilization of them for feeding plants is really a system of recycling much like composting.

So, when the debate of whether you should fertilize your plants pops in your head remember: organic fertilizer is the right choice for you and your family. Check out our fertilizers here.

https://www.espoma.com/wp-content/uploads/2017/05/Dog-lawn-e1522699593671.jpg 401 600 espoma https://www.espoma.com/wp-content/uploads/2023/05/espoma-logo340w-1.png espoma2018-04-02 16:24:232022-04-12 15:52:10To Feed or Not to Feed: Organic Fertilizer Run Down
Where to Buy

Get News & Updates

Recent Posts

  • VIDEO: How to Plant a Raised Bed Like a Pro with Farmer Nick
  • VIDEO: Transplanting Magnolias 🪴🌺 with Wyse Guide
  • VIDEO: How to Care for Roses 🌹 & Hydrangeas 🌸 with Garden Answer
  • VIDEO: How to Grow a Hummingbird Garden 🕊️🌿🌺 | Growing Joy with Maria
  • VIDEO: Boost Your Blooms: 🌸 Fertilizing Hydrangeas the Organic Way with Skye Hamilton

Tags

All-Purpose Potting Mix bio-tone Bio-tone Starter Bio-tone Starter Plus cactus and succulents Cactus Mix caring for houseplants Container Gardening DIY project Espoma espoma grown espoma organic Espoma Organics Espoma Video fall gardening flower garden flowers garden Garden Answer Gardening gardening tips gardens grow holly-tone houseplants Indoor! indoor gardening indoor plants Kaleb Wyse organic organic fertilizer Organic Gardening organic plant food Organic Potting Mix Outdoor Gardening Planting plants Potting Mix potting soil Spring Gardening succulents summer rayne oakes vegetable garden Vegetable Gardening Wyse Guide

Espoma. A Family Tradition Since 1929.

Espoma Organic logo
  • Espoma Dealer
  • Espoma Pro
  • Garden Club
  • Privacy Policy

Scroll to top