Espoma Organic
  • Products
    • Close
    • Product Line Overview
    • Plant food finder
    • Garden Fertilizers
    • Potting Soils
    • Liquid Fertilizers
    • Lawn Fertilizers
    • Single Ingredients
    • Conventional Plant Foods
    • Animal Care Products
  • Where to Buy
  • Our Story
    • Close
    • Our Story
    • Locations
    • Historical Timeline
    • Our Commitment
    • Directions
    • Solar
    • Join our Team
    • Espoma Brand Partners
  • Learn
    • Close
    • Espoma Blog
    • FAQ’s
    • Pocket Guide
    • Espoma Guides
    • Garden Clubs
    • Safe Paws Lawn
    • PRODUCT FACT SHEETS
    • Fertilizer Fundamentals
      • Close
      • Understanding Plant Nutrition
      • Reading Labels
      • Choosing the Right Type of Fertilizer
      • Terms & Definitions
    • Gardening Projects
    • Resource Links
  • Contact Us
  • Menu Menu

Tomato Woes – How to Solve Common Tomato Diseases

June 30, 2016/in Fruits & Vegetables

No other flavor in the garden can compete with sun-ripened tomatoes! Just seeing their bright, shiny color emerge gets us giddy!

We want to make sure you get to experience the joy of your homegrown, golden delights this year.

So, if you spot a worrisome sign on your tomatoes, here’s how to identify and fix it – the organic, natural way!

Dr. Tom A. To: How to Identify and Fix Common Tomato Diseases and Problems

tomato-tone, growing tomatoes, organic gardening

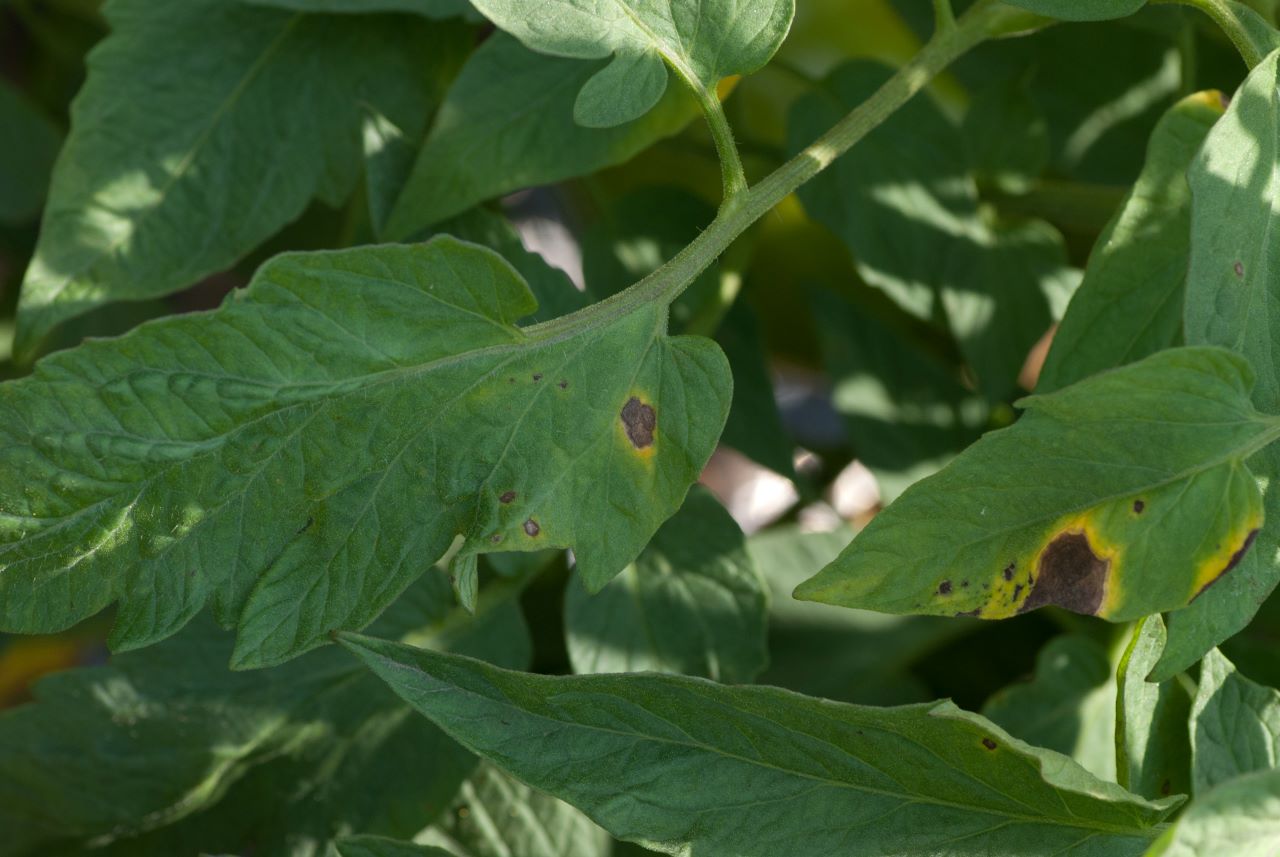
Photo courtesy of Dwight Sipler.

The Mark of Dark Spots. First, you’ll see tiny spots on tomatoes’ lower leaves, usually after the first fruit has set. From there, the spots grow larger and begin to look like a target. That’s early blight.

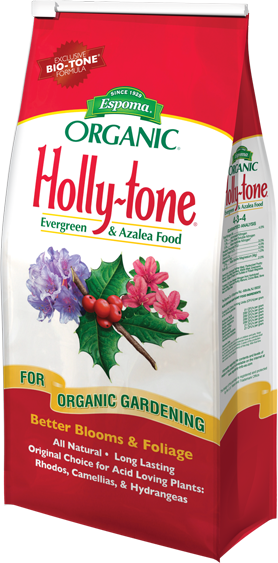
To fix, remove infected leaves as well as lower leaves. Water in the morning to prevent further spread of this fungus. Low nitrogen levels often cause early blight, so feed with Tomato-tone monthly.

Clemson University – USDA Cooperative Extension Slide Series, Bugwood.org

tomato-tone, growing tomatoes, organic gardening

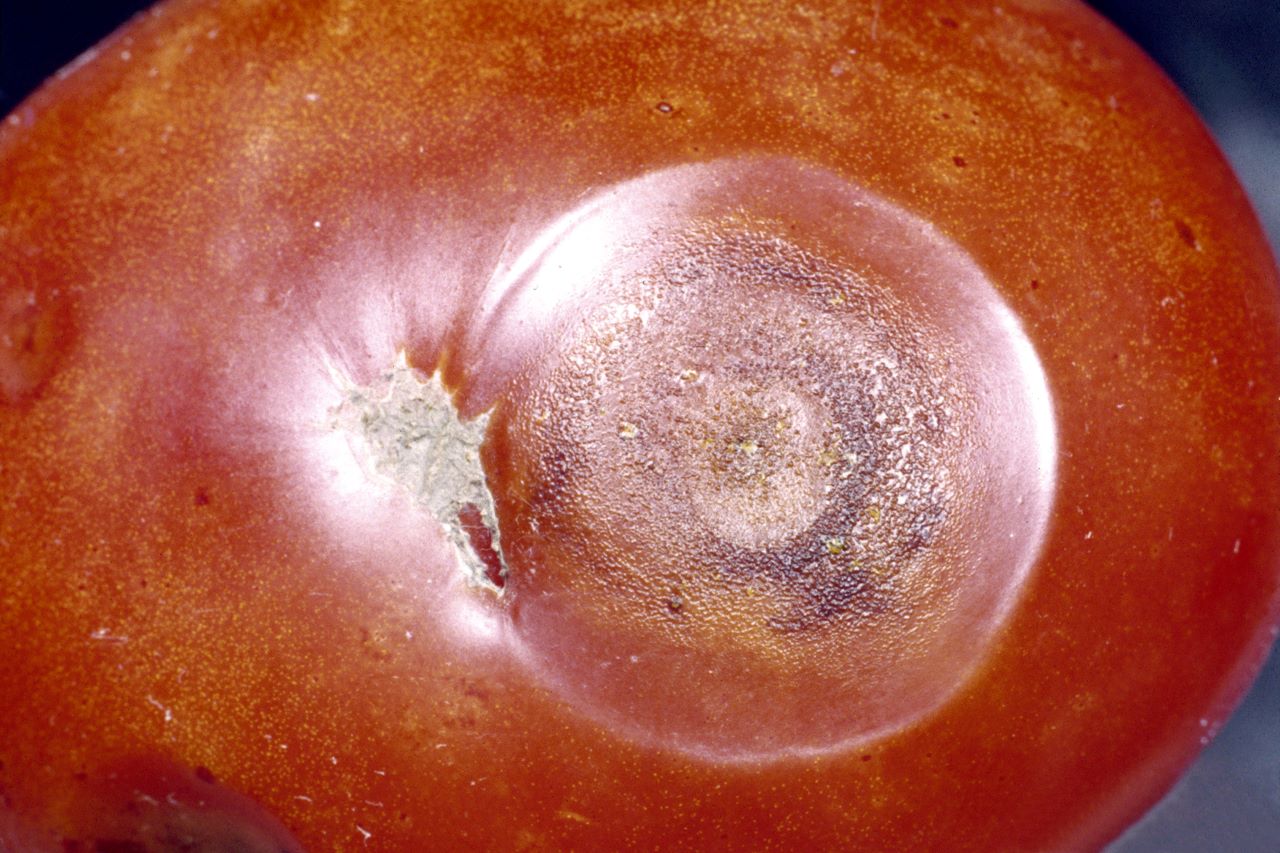
Photo courtesy of Clemson University – USDA Cooperative Extension Slide Series, Bugwood.org

The Bruise Blues. If small, sunken spots or what looks like bruises appear on your ripe tomatoes, that’s anthracnose. This fungus emerges as the weather gets hot and humid – usually 80° or warmer.

So, harvest ripe tomatoes as soon as possible. These are safe to eat if you cut off the bruises. Then water tomatoes in the morning.

tomato-tone, growing tomatoes, organic gardening

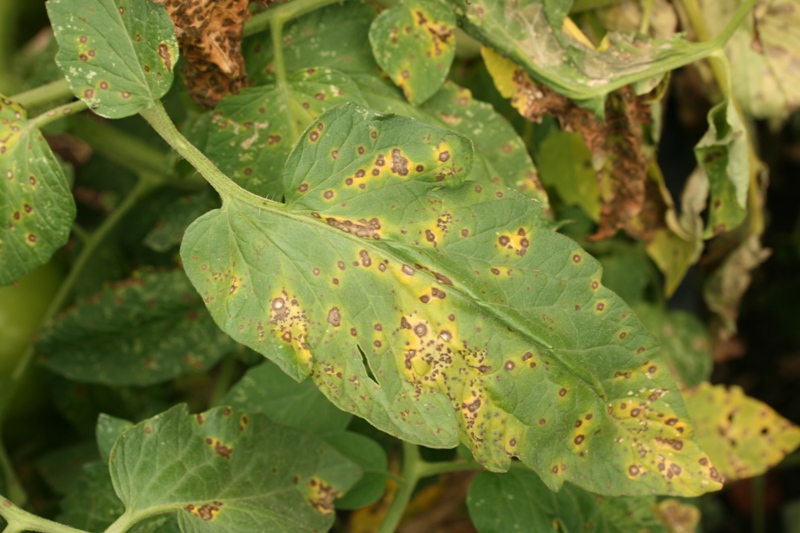
Photo courtesy of Missouri Botanical Garden.

So Many Spots. If tiny, greyish-brown dots cover your tomato leaves, Septoria leaf spot is to blame. Soon, leaves will fall off. Though, a harvest will usually still happen.

To remedy, remove all infected leaves. Then apply a copper fungicide – if you’re organic gardening.

tomato-tone, growing tomatoes, organic gardening

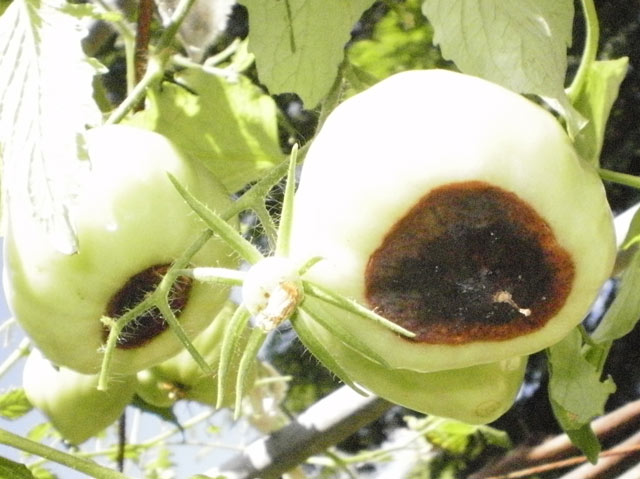
Brown Bottom. See circular brown spots on the bottom of your half-grown tomatoes? That’s blossom-end rot, which is usually caused by a lack of calcium in the soil. Blossom end rot should only happen to a few tomatoes early in the season, not the whole bunch.

To fix, use an organic tomato fertilizer with calcium.

tomato-tone, growing tomatoes, organic gardening

Photo courtesy of Victor M. Vicente Selvas

Built to Wilt. Wilting, curling leaves could be bad news for your tomatoes. If paired with stunted grown or browning veins or blotches, your tomatoes have Fusarium or Verticillium wilts. These diseases are caused by a super vicious fungus in the soil.

And, there’s no cure for it. Remove and rid your garden of these tomatoes. Do not compost. Then, solarize the soil to kill the fungus. Otherwise, when you plant veggies in the same area, they, too, will get this disease for the next 4-6 years.

Next time, when you’re growing tomatoes, select disease-resistant varieties to avoid some of these common problems.

See our guide to growing tomatoes here


Where to Buy
https://www.espoma.com/wp-content/uploads/2016/06/tomatoes-355941_1920.jpg 1280 1920 espoma https://www.espoma.com/wp-content/uploads/2023/05/espoma-logo340w-1.png espoma2016-06-30 09:38:302022-04-12 09:32:21Tomato Woes – How to Solve Common Tomato Diseases

How to Fertilize Blueberry Plants

June 28, 2016/in Fruits & Vegetables

There’s nothing like fresh-picked blueberries to add to a smoothie, salad or dessert. Rich in many health-benefiting nutrients, anti-oxidants, and vitamins, blueberries don’t just taste delicious, they’re also nutritious.

The secret to grow delicious, thriving blueberry plants: feed them, a lot.

Maximize your blueberry bushes’ health, help it resist insects and diseases, and boost your harvest by providing the right kinds of soil amendments.

When to Fertilize Blueberries

Fertilizing is recommended in early spring before the leaves have grown in. This gives the fertilizer time to be absorbed by the roots of the blueberry before it enters its active growth stage during summer.

Feed new plants once in early spring and again in late spring. Healthy, established plants should not need to be fed more often than once a year.

Espoma soil acidifier, Holly-tone, growing blueberries, Brazelberries Peach Sorbet

Photo courtesy of Bushel and Berry™

The Best Fertilizer for Blueberries

Blueberry bushes respond best to acid fertilizers such as those for rhododendrons and azaleas. Holly-tone has long been used by professional gardeners as the best source of food for berries.

From blocking weeds to conserving water, mulching goes hand in hand with fertilizing and is also very important for blueberry bushes. By feeding as it decomposes, mulch helps to maintain soil acidity. The best mulch options are oak leaves, pine straw or pine bark. Gardeners should spread it in a 3-4” thick layer.

Espoma soil acidifier, Holly-tone, growing blueberries

How to Fertilize Blueberries

For established plants, spread one cupful of Holly-tone per foot of branch spread. Double the quantity if branch spread is 3’ or larger.

If the area to be fed is mulched, remove as much mulch as you can, feed, and then restore the mulch on top of the plant food. If you can’t remove the mulch, just double recommended feeding rates.

To lower the pH of soils for optimum growth of acid-loving plants such as blueberries, you can also mix in Soil Acidifier as needed.

Always water well after fertilizing.

See the Total Berry Guide Here


Espoma Holly-tone


https://www.espoma.com/wp-content/uploads/2016/06/blueberry-1062712_1280.jpg 853 1280 espoma https://www.espoma.com/wp-content/uploads/2023/05/espoma-logo340w-1.png espoma2016-06-28 08:00:342024-09-27 15:24:33How to Fertilize Blueberry Plants

How Much Water Do My Tomato Plants Need?

June 23, 2016/in Fruits & Vegetables

Imagine having a successful, bountiful tomato harvest every season — juicy, red tomatoes ready for the kitchen.

The good news? You can! Tomato care isn’t hard.

When it comes to growing tomatoes in your organic vegetable garden, the secret is in the soil. Maintaining consistent soil moisture is crucial for a successful harvest.

When, and how frequently, you should water your tomato plants depends on the variety, size and location.

tomato-tone, growing tomatoes, organic gardening

Start Your Seedlings

When starting tomatoes from seed, the soil can dry out quickly since seedlings are typically in small containers or trays. Check soil daily to ensure it has not dried out.

However, seedlings require very little water. Use a spray bottle to mist seedlings and keep just the top of the soil moist.

If the soil becomes too wet, move the seedlings to an area with increased air flow and hold off on watering again until needed. Never let seedlings sit in a puddle of water.

As seedlings begin to sprout and grow, they will need more water. If the soil in the tray dries in less than 24 hours, it might be time to move your seedlings to the garden or a larger container.

The best way to give your tomatoes the care they need is to closely monitor the plants and the soil moisture weather.

Growing in the Garden

When you plant tomatoes right in the ground, the roots can extend deep into the soil as they seek out water. Water newly planted tomatoes well to make sure soil is moist and ideal for growing.

Early in the growing season, watering plants daily in the morning. As temperatures increase, you might need to water tomato plants twice a day. Garden tomatoes typically require 1-2 inches of water a week.

Container Tomato Plants

Tomato plants grown in containers need more water than garden tomatoes. Soil in containers heats up faster which leads to more water evaporation.

A good rule of thumb for containers is to water until water runs freely from the bottom. Water in the morning and check the soil moisture levels again in the afternoon. If soil feels dry about 1 inch below the surface, it’s time to water again.

Keep Tomatoes Well Fed

Adding organic mulch to tomato plants reduces evaporation in the soil. That means less watering, so you can save time and resources.

Add Espoma’s organic Tomato-tone, a slow release premium plant food, for bigger, healthier roots that can withstand a little drought and excess heat.

There are many factors that affect how much water tomato plants need, such as weather conditions and the size and growth rate of the plant. Every plant is different! The best way to give your tomatoes the care they need is to closely monitor the plants and the soil moisture weather.

See our guide to growing tomatoes here


Where to Buy


https://www.espoma.com/wp-content/uploads/2016/06/watering-can-342553_1920.jpg 1303 1920 espoma https://www.espoma.com/wp-content/uploads/2023/05/espoma-logo340w-1.png espoma2016-06-23 08:00:182022-04-12 09:33:35How Much Water Do My Tomato Plants Need?

Fix It to Nix Hydrangea Problems

June 21, 2016/in Flowers

Hydrangeas are supposed to be forever gorgeous! The most flawless, must-have flowers in the garden! Yet, you may see black spots on your hydrangea’s leaves. Or worse yet, blooms are turning brown!

Don’t worry.

Stick with us, and we’ll have your garden favorite looking tip-top again. Here’s how to easily fix those common hydrangea problems.

Here’s how to easily fix those common hydrangea problems.

Simple Steps to (Once-Again) Stunning Blooms — How to Solve Common Hydrangea Problems

1. Not a Spot! When it’s unusually rainy (or if you’re overwatering), hydrangeas’ leaves develop unsightly, black spots. This is a pretty harmless leaf fungus with a scary name — Cercospora! Prune away heavily affected areas and spotted leaves to prevent the fungus from spreading.

2. Will to Wilt. Hydrangea blooms drooping or wilting? Most likely, your plant is soaking up too much sun and not getting enough water. Check to see if the soil is moist 1-2” deep. If not, water deeply. For best hydrangea care, repeat weekly. Add a bit of mulch to help conserve water, too. If that’s not the case, check your soil’s nitrogen levels using a soil test. Add necessary amendments.

3. Brown Blooms. If your hydrangea blooms are turning brown too soon and quickly petering out, they likely need more water. Ditto if your flowers wilt during the day and don’t bounce back at night. To confirm, look for brown spots on leaf edges. To fix, deeply water hydrangeas once a week.

Here’s how to easily fix those common hydrangea problems.

4. Holey-Moly Foliage. Fruit worms and slugs munch holes through hydrangea leaves. Lift up a holey leave. If you find what looks like a caterpillar, that’s a fruit worm! Get rid of them with soapy water. If nothing’s there, it’s likely slugs. You can hand pick them at night — or give them a night cap. Bury a plastic cup near the hydrangea, so the rim is level with the soil. Then, fill the cup halfway with beer.

5. Blooms Be Gone. No flowers on your hydrangea? You likely pruned your hydrangea at the wrong time — and cut off all its new blooms. Skip the pruning this year, and check out our tips for pruning hydrangeas so you never prune hydrangeas at the wrong time again.

6. Purple Pout. If your leaves have purple spots, remove the affected leaves and branches. If the entire leaf is purple, your soil may not have enough phosphorous. Perform a soil test and amend as needed.

Abracadabra! Your hydrangea problems will be gone soon. Then, you can focus on all the best parts of growing hydrangeas — like admiring those big, fluffy flowers!

Find the right hydrangea for you by choosing one that loves sun, blooms all summer or is perfect for beginners.

Guide to Growing Hydrangeas Here


https://www.espoma.com/wp-content/uploads/2016/06/hydrangea-1207737_1920.jpg 1280 1920 espoma https://www.espoma.com/wp-content/uploads/2023/05/espoma-logo340w-1.png espoma2016-06-21 08:00:042022-04-13 11:28:15Fix It to Nix Hydrangea Problems

Mulch Tomatoes Now to Save Time Later

June 16, 2016/in Vegetable Gardening

Add mulch, a natural covering on top of soil, to keep moisture in, block weeds and provide added nutrients. But did you also know that mulch is particularly important for tomato plants?

If you grow tomato plants, then you have to understand the importance of mulch.

Why is Mulch So Important for Tomatoes?

1. Mulch Protects

Many tomato plants grow large, heavy fruit. Mulch protects the lowest-growing fruit from resting on the ground and developing rot.

2. Mulch Blocks Weeds

Weeds are usually no problem for tomatoes since the large plants, with their dense foliage, shade out and smother any weeds. However, mulch around staked or trellised plants will keep down those baby weeds, so they won’t rob the plants of water and nutrients.

tomato-tone, growing tomatoes, organic gardening

3. Mulch Saves Water

Staked and trellised plants usually benefit from mulch to save moisture. More exposed to sun and wind than unstaked plants, they lose more water through their leaves. It takes extra effort to provide them with an ample and even supply of moisture, but in dry climates, it’s worth it.

4. Mulch Keeps Plants Clean

A mulch blanket under your plants keeps soil from splashing onto the leaves, which helps prevent disease, something tomatoes are especially prone to.

How to Mulch Tomatoes

Many make the mistake of laying mulch around tomatoes too early. You should wait until late spring or until the ground has really warmed up. Adding mulch will inhibit soil from warming and delay the harvest a few weeks.

Once the soil has warmed, feed your tomatoes again with Tomato-tone. Then spread a 2-3” layer of organic mulch. Be sure to leave 2” of room around the stem so water can reach the roots. Water well.

The Best Organic Mulches for Tomatoes

tomato-tone, growing tomatoes, organic gardening

Shredded Leaves: Composted leaves are great for vegetable gardens because they provide natural weed protection and increase moisture retention.

Grass Clippings: If you apply organic lawn fertilizer, dry grass clippings are a great option. They mat together to protect plants and retain heat.

Straw: Straw makes great mulch for tomatoes. But stay away from hay, as it’s full of seeds. Spread a 3-6” layer around tomatoes.

tomato-tone, growing tomatoes, organic gardening

Newspaper or Cardboard: Newspaper is best for blocking weeds. Cut or tear into strips that fit easily around plants.

See our guide to growing tomatoes here
https://www.espoma.com/wp-content/uploads/2016/06/tomatoes-879441_1920.jpg 1326 1920 espoma https://www.espoma.com/wp-content/uploads/2023/05/espoma-logo340w-1.png espoma2016-06-16 10:47:322022-04-12 09:34:56Mulch Tomatoes Now to Save Time Later

How to Fertilize Trees

June 14, 2016/in Blog, Espoma Videos, Garden Answer

Laura from Garden Answer demonstrates how to fertilize a tree using Espoma’s Tree-tone. The slow release formula provides a long lasting nutrient reservoir to feed the entire tree, leaves, trunk, and roots.

Learn more about Garden Answer here:

Youtube

Website

Facebook

Instagram


Featured Products:


Where to Buy

https://www.espoma.com/wp-content/uploads/2016/06/Tree-Fertilizer-Thumbnail.jpg 720 1280 espoma https://www.espoma.com/wp-content/uploads/2023/05/espoma-logo340w-1.png espoma2016-06-14 13:17:502024-03-06 12:32:30How to Fertilize Trees

Stop Blossom-End Rot

June 14, 2016/in Vegetable Gardening

You’re on your way to growing the perfect tomatoes. Once you’ve selected your favorite varieties, planted and cared for the seedlings, all that’s left is to take a bite into your first harvest.

But wait. That tomato doesn’t look so appetizing.

If a dark, water soaked spot has formed on your tomato you may have blossom-end rot. This problem is likely caused by an imbalance of calcium in the plant. You may also see this on peppers, squash, cucumbers and melons. The spot enlarges and darkens rapidly as fruits develop. Large spots will dry out and appear to be leathery.

tomato-tone, growing tomatoes, organic gardening

Tips to Keep Blossom End Rot Away

  • Maintain consistent soil moisture throughout the growing season. When the weather is dry, water at least twice a week and moisten the soil to a depth of at least 6 inches.
  • Plant tomatoes in warm soil. Seedlings planted in cold soil are likely to have limited nutrient uptake.
  • Fertilize with Tomato-Tone to make sure plants are getting the nutrients they need.
  • Amend soil to maintain soil pH at or near 6.5.
  • Add a layer of mulch to minimize evaporation and help maintain consistent soil moisture. Remember not to volcano mulch.

The reasons are many as to why the plant may not be able to take up enough calcium to support the fruit, but most lie in the soil. The best way to prevent blossom end rot is to have a soil test done before planting to determine if the soil has adequate calcium.

Other reasons include:

1. Fluctuations in soil moisture

2. Excess of nitrogen in the soil

3. Root damage

4. Soil pH that’s either too high or too low

5. Soil that’s too cold

6. Soil that’s high in salts

Unfortunately there’s no use saving these tomatoes. Pick off damaged fruit as soon as you notice the rot and compost them.

See our guide to growing tomatoes here


Where to Buy

https://www.espoma.com/wp-content/uploads/2016/06/Blossomendrot.jpg 1541 1381 espoma https://www.espoma.com/wp-content/uploads/2023/05/espoma-logo340w-1.png espoma2016-06-14 09:12:052024-09-07 07:59:16Stop Blossom-End Rot

Tomato Suckers: What Do With Them

June 9, 2016/in Vegetable Gardening

Tomatoes are one of the easiest things to grow in your organic garden. Plant, feed, water and eat!

Yet a few simple tricks will help you be more successful and produce a ton of fruit!

Today’s garden tip: What to do with tomato suckers?

First, let’s determine what tomato suckers are. Then, you can choose whether or not to keep them.

What Are Tomato Suckers?

Tomato suckers are small shoots, or leaves, that sprout out from where the stem and the branch of a tomato plant meet. Although relatively harmless to the plant, suckers don’t serve much of a purpose.

They can, however, draw energy away from the main stems, decreasing tomato growth.

How to Prune Tomato Suckers

  1. Keep a close eye on your tomato plants. Eliminate suckers while they are just a small ½” stem.
  2. Remove by simply snapping them off at the stem. If you need to use a tool, use a sharp pruner blade to make a clean cut.
  3. During peak growing season, pull unnecessary suckers and flowers at least once a week.
  4. Pruning is especially important if you are growing indeterminate tomatoes. This variety produces fruits all season long, as opposed to a single harvest. They require more attention and maintenance in order to encourage growth.

Pruning tomato suckers is one of the keys to a successful harvest.

To Prune or Not To Prune…

Some argue that tomato suckers are beneficial because more leaves can lead to more fruit.

This is true, however, less dense tomato plants may produce larger, juicier tomatoes. (Don’t forget, to also use Espoma Organic Tomato-tone to promote growth of plump tomatoes.)

Removing tomato suckers can also decrease risk of disease caused by prolonged moisture. With fewer leaves, plants receive more air and leaves dry quicker. Fewer leaves also provide fewer places for insects to nest and gnaw.

Because suckers can potentially cause more harm to the garden than good, consider pruning those suckers.

See our guide to growing tomatoes here


Where to Buy


If you’re looking for more info on tomatoes, such as easy tomatoes to grow, hybrid tomatoes or non-red tomatoes, please visit our Organic Tomato Gardening Guide for more tips and tricks.

https://www.espoma.com/wp-content/uploads/2016/06/tomato-suckers.jpg 350 316 espoma https://www.espoma.com/wp-content/uploads/2023/05/espoma-logo340w-1.png espoma2016-06-09 08:00:592022-04-12 09:39:30Tomato Suckers: What Do With Them

No Way Blue Jay! Keep Birds from Eating Berries

June 7, 2016/in Fruits & Vegetables


Sun-kissed, slightly tart blueberries. Sweet, juicy raspberries. Scrumptious strawberries as sweet as candy. Sugary, tart blackberries.

Who can resist such delightful, fresh flavors right from the garden?

Certainly not local birds! Crows, blackbirds, robins, jays and more swoop in and eat your berries right from under you!

If you’re growing blueberries (or any berries!), you want to make sure you get to enjoy them, not the birds. Here are our tips for protecting your berries from those hungry birds — while still being kind.

Espoma soil acidifier, Holly-tone, growing blueberries

If you’re growing blueberries, make sure you get to enjoy them, not this sparrow. Here are our tips for protecting your berries from those hungry birds — while still being kind.

Take Back the Patch — How to Protect Fruit from Birds, Naturally and Organically

1. Location, Location, Location. Plant or move berries away from hedges and larger shrubs since birds like to rest there.

2. Take Cover! When your berries are immature, add a row cover or bird netting. Make sure the netting is secure, so the birds can’t undo it. This is, hands down, the best way to protect berries.

3. A Sprinkle of Sparkle. Tie a shiny bird scare tape, or foil tape, around your berry bushes or plants to deter birds. Birds don’t like the movement or the tape’s bright reflection.

4. A Dash of Pepper. Sprinkle cayenne pepper around your berry plants as they begin to ripen. This method is super easy, but makes it hard to enjoy eating berries as you pick! You have to wash off the berries before eating to remove any remaining pepper.

5. Snack Attack! Install a few bird feeders to encourage birds to eat there — and not your berry bushes!

Victory! Now, make sure your blueberries continue to thrive by feeding with Holly-tone. Keep the soil acidic, too, with Espoma’s Organic Soil Acidifier.

See the Total Berry Guide Here


https://www.espoma.com/wp-content/uploads/2016/06/sparrow-1265598_1920.jpg 1079 1920 espoma https://www.espoma.com/wp-content/uploads/2023/05/espoma-logo340w-1.png espoma2016-06-07 10:58:062022-04-12 14:40:41No Way Blue Jay! Keep Birds from Eating Berries

3 Ways to Support Tomatoes

June 2, 2016/in Fruits & Vegetables

Soon your tiny tomato plants will transform into gigantic bushes. Help them grow by giving them some extra support.

Tomato plants often bend, lean or even break as fruit matures. To help your plant from being damaged, get to know the tomato you’re planting. Indeterminate plants will continue to grow and will benefit from some support, while determinate tomatoes may be just fine on their own.

Use tomato cages, wood or metal stakes, or a trellis to give plants extra support. It’s really a matter of preference which one you choose. The most important thing is that you’re keeping plants off the ground to avoid pests, diseases and rot.

Put supports in your garden before or at the same time you plant tomatoes. Tomatoes will be easier to maintain, prune and harvest.

Stake

Choose 6’ to 8’ tall stakes made of wood, plastic or bamboo. Or, create your own from recycled materials.

  1. Pound stake firmly into the ground, about 12” deep, beside tomato plant.
  2. Tie stalk loosely to the stake using twine as soon as flowers appear. Stakes will bear the weight of plants as they grow, preventing branches from tipping and breaking.
  3. Continue tying plants to stakes as they grow.
  4. Water tomatoes regularly and fertilize with Tomato-tone every two weeks.

Cage

Cages can be purchased at your local garden center and they’re easy to remove at the end of the season and store for next year’s use. Choose metal, wooden or plastic tomato cages. Metal cages often hold up better and last longer, but are prone to rust.

  1. Choose 6’ cages for indeterminate and heirloom varieties.
  2. Plant tomatoes and center the cage over the center of the plant.
  3. Depending on the full grown size of your tomatoes, set cages about 4’ apart.
  4. Push the tomato cage legs into the dirt until the bottom rung is even with the base of the tomato plant.
  5. Water tomatoes regularly and fertilize with Tomato-tone every two weeks.

Trellis

Trellising your tomatoes offers them support and is a great way to maximize small spaces. They keep tomatoes off the ground and allow for easy pruning.

  1. Push two 6’ poles or wooden posts into the ground, about 10’ apart. Poles should not wobble.
  2. Tie wire or twine between posts, adding lines across the top, bottom and middle.
  3. Plant tomatoes along the length of trellis.
  4. Water tomatoes regularly and fertilize with Tomato-tone every two weeks.
  5. As plant grows, train stems by attaching stems to the trellis using twist ties, wires or twine.
See our guide to growing tomatoes here


Where to Buy


https://www.espoma.com/wp-content/uploads/2016/06/Tomato-Trellis.jpg 1424 2144 espoma https://www.espoma.com/wp-content/uploads/2023/05/espoma-logo340w-1.png espoma2016-06-02 08:00:332022-04-12 09:42:183 Ways to Support Tomatoes
Where to Buy

Get News & Updates

Recent Posts

  • VIDEO: How to Plant a Raised Bed Like a Pro with Farmer Nick
  • VIDEO: Transplanting Magnolias 🪴🌺 with Wyse Guide
  • VIDEO: How to Care for Roses 🌹 & Hydrangeas 🌸 with Garden Answer
  • VIDEO: How to Grow a Hummingbird Garden 🕊️🌿🌺 | Growing Joy with Maria
  • VIDEO: Boost Your Blooms: 🌸 Fertilizing Hydrangeas the Organic Way with Skye Hamilton

Tags

All-Purpose Potting Mix bio-tone Bio-tone Starter Bio-tone Starter Plus cactus and succulents Cactus Mix caring for houseplants Container Gardening DIY project Espoma espoma grown espoma organic Espoma Organics Espoma Video fall gardening flower garden flowers garden Garden Answer Gardening gardening tips gardens grow holly-tone houseplants Indoor! indoor gardening indoor plants Kaleb Wyse organic organic fertilizer Organic Gardening organic plant food Organic Potting Mix Outdoor Gardening Planting plants Potting Mix potting soil Spring Gardening succulents summer rayne oakes vegetable garden Vegetable Gardening Wyse Guide

Espoma. A Family Tradition Since 1929.

Espoma Organic logo
  • Espoma Dealer
  • Espoma Pro
  • Garden Club
  • Privacy Policy

Scroll to top